

|
| Advanced Blogger Meta Tag Settings Code 2023 |
Blogger is a popular platform for creating and managing blogs. Properly configuring meta tags is essential for optimizing your blog's SEO (Search Engine Optimization) and improving its visibility in search engine results. In this section, we'll cover the basic meta tag settings provided by Blogger and also provide some advanced meta tag code that you can implement to further enhance your blog's SEO.
Basic Blogger Meta Tag Settings:
To access the basic meta tag settings in Blogger, follow these steps:
Step 1: Log in to your Blogger account.
Step 2: Go to your Blogger Dashboard.
Step 3: Select the blog you want to work on (if you have multiple blogs).
Step 4: From the left sidebar, click on "Settings."
Step 5: Click on "Search preferences."
Here you'll find some essential meta tag settings:
Meta Description: This allows you to set a meta description for your blog, which gives search engines a brief summary of your blog's content. Make sure it accurately represents your blog's focus and includes relevant keywords.
Custom Page Not Found: You can create a custom 404 error page with a meta description to guide visitors when they encounter broken links or non-existent pages.
Custom Redirects: This feature allows you to set up 301 redirects for old URLs to new ones, preserving SEO value when you change your blog's URL structure.
Advanced Blogger Meta Tag Code:
<!-- Meta Tag for Charset -->
<meta charset='UTF-8'>
<!-- Meta Tag for Mobile Responsiveness -->
<meta name='viewport' content='width=device-width, initial-scale=1.0'>
<!-- Meta Tag for Robots -->
<meta name='robots' content='index, follow'>
<!-- Meta Tag for Language -->
<meta name='language' content='English'>
<!-- Meta Tag for Author -->
<meta name='author' content='Your Name'>
<!-- Meta Tag for Keywords (Replace with relevant keywords) -->
<meta name='keywords' content='blog, blogging, SEO, technology'>
<!-- Meta Tag for Open Graph (Facebook) -->
<meta property='og:title' content='Your Blog Title'>
<meta property='og:description' content='Your Blog Description'>
<meta property='og:image' content='URL to your blog's logo or featured image'>
<meta property='og:url' content='URL to your blog'>
<!--<b:if cond='data:view.url == data:view.url params { amp: "1" }'> <link expr:href='data:view.url' rel='alternate'/> <b:else/> <link expr:href='data:view.url + "?m=1"' rel='alternate'/> <link expr:href='data:view.url params { amp: "1" }' rel='amphtml'/> </b:if>-->
<!-- Meta Tag for Twitter Card -->
<meta name='twitter:card' content='summary'>
<meta name='twitter:title' content='Your Blog Title'>
<meta name='twitter:description' content='Your Blog Description'>
<meta name='twitter:image' content='URL to your blog's logo or featured image'>
<meta name='twitter:url' content='URL to your blog'>
To add the above code to your Blogger template:
Step 1: Go to your Blogger Dashboard.
Step 2: Select the blog you want to work on (if you have multiple blogs).
Step 3: From the left sidebar, click on "Theme."
Step 4: Click on the "Edit HTML" button.
Step 5: Find the <head> section in your template.
Step 6: Insert the advanced meta tag code just above the closing </head> tag.
Step 7: Save your template.
Please ensure you replace the placeholders (e.g., Your Blog Title, Your Blog Description, URL to your blog) with your actual blog information.
For more advanced meta tag settings, you can edit your Blogger template HTML and insert custom meta tags. Here are some examples of advanced meta tag code:
You can change this section or leave it as before, some of these settings will not have much effect on the appearance of your Blog but may have little effect on SEO. This guide is provided only as a support for those of you who want to customize our theme.
Search Description
You can add a special description to the search results according to what you wrote, if you disable this section the Google robot will randomly choose a description that appears according to the keywords that user looking for.


|
| Illustration of search results |
Additional information:
The search description is different from the blog description (in Blogger settings) and is completely unrelated, the search description will be different on each page depending on the sentence you write.
To add a search description, please go to the Blogger dashboard:
- On the Blogger dashboard, click Settings
- Scroll at the bottom until you find the Meta Tag setting group

- If it's not active, please activate it first by pressing the switch button on the right side.
- Fill in the search description for your blog with a maximum of 150 characters
- Also include a search description in each of your posts.


In post page the search description will appear just below the article title, this applies to all themes. However you can still delete it, please follow the method below:
Remove description at the bottom of post title- On the Blogger dashboard, clickThemes
- Click icon on the Customize button
- Click Edit HTML, you will be directed to the editing page.
- Find the code below, you can delete or disable it by adding a comment tag
<!-- --><!-- Post Description --> <div class='pD'><data:blog.metaDescription/></div>
<!-- Post Description -->
<!-- <div class='pD'><data:blog.metaDescription/></div> -->
Meta Image
This setting serves to display thumbnails for blogs or posts shared on social media such as WhatsApp, Facebook or Twitter

On the posting page, thumbnails will automatically appear by taking the first image in article, Thumbnails only don't appear when the blog's homepage link (example: https://www.your_domain.com) is shared on social media, to solve this, please find the code below:
<meta content='Add_your_image_url_here' property='og:image'/>
<meta content='Add_your_image_url_here' name='twitter:image:src'/>
The above code is placed separately, change the part marked with your image url.
To get the image url, you can upload it to the post editor first. When finished uploading, right click on the image > Copy image address
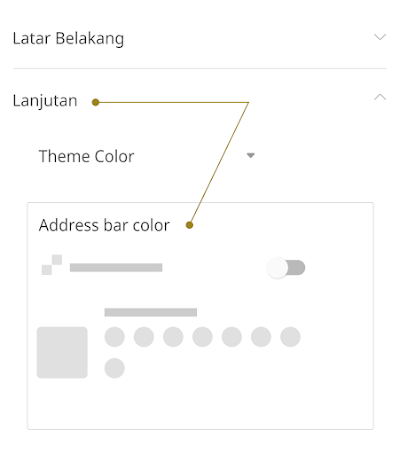
Address Bar Color (Mobile Only)
This feature is only visible on mobile devices based on Android or iOS in certain browsers, to replace this section you don't need to edit your HTML template, please go to Blogger theme designer or follow the guide below:
- On the Blogger dashboard, click Themes,
- click Customize
- click Advanced tab on the left sidebar, look at the image below:
- In the Theme Color settings > Address bar color, please select the color you want.
Alternative Keyword
You can add other keywords on your blog home page to target your blog audience. Look for the code below and change the sections marked with the keywords you want:
<meta expr:content='data:blog.title.escaped + ", " + data:blog.pageName.escaped + ", Keyword_1, Keyword_2, Keyword_3 "' name='keywords'/>
Instruction:
Separate with commas to add new keywords
Customize Blog Title
However you can still change the default title in this theme for certain pages, the title referred here is the title format that will appear in search results and browser tabs.
In general, blog titles are written with code like this:
<title>Blog_title_here</title>
While the overall code for the blog title on our theme is as follows:
<b:if cond='data:view.isMultipleItems'>
  <b:if cond='data:view.isHomepage'>
    <!--[ Homepage title ]-->
    <title><data:blog.title.escaped/></title>
    <b:elseif cond='data:view.search.query'/>
    <!--[ Search title ]-->
    <title><data:messages.search/>: <data:view.search.query/></title>
    <b:elseif cond='data:view.search.label'/>
    <!--[ Label title ]-->
    <title><data:blog.pageName.escaped/> - <data:blog.title.escaped/></title>
    <b:elseif cond='data:view.isArchive'/>
    <!--[ Archive title ]-->
    <title>Blog archive in: <data:blog.pageName.escaped/></title>
    <b:else/>
    <title>Blog: <data:blog.title.escaped/></title>
  </b:if>
  <b:elseif cond='data:view.isError'/>
  <!--[ Error title ]-->
  <title>Error 404: Not Found</title>
  <b:else/>
  <!--[ SingleItem title ]-->
  <title><data:blog.pageName.escaped/> - <data:blog.title.escaped/></title>
</b:if>
Title on Homepage
The code for the home page title is written like this:
<!--[ Homepage title ]-->
<title><data:blog.title.escaped/></title>
You can modify the title above, such as adding an alternative sentence, for example: Blog Name: Additional_sentence here. Please change the line of code above to be as below:
<!--[ Homepage title ]-->
<title><data:blog.title.escaped/> : alternatif_title_here</title>
Title on Index Pages
Displaying titles on index pages (other than home pages, posts and static pages) in Blogger is marked with /search in the url, there are several conditions written to display different titles on index pages including:
<!--[ Search title ]-->
<title><data:messages.search/>: <data:view.search.query/></title>
Displaying title of the search page on your blog, automatically any keywords written by the user will appear in this title. Change the code <data:messages.search/> above with the words you want such as Search results or others.
<!--[ Label title ]-->
<title><data:blog.pageName.escaped/> - <data:blog.title.escaped/></title>
<title>Blog: <data:blog.title.escaped/></title>
This title will only appear on the /search page, for example: https://www.your_domain.com/search. You can change the word Blog: in the code above.
Title on Post Page
<!--[ SingleItem title ]-->
<title><data:blog.pageName.escaped/> - <data:blog.title.escaped/></title>
The code above will display a title like this: Post_title - Blog_title. You can remove the blog title by removing the code - <data:blog.title.escaped/> above.
Error 404 Page Title
<!--[ Error title ]-->
<title>Error 404: Not Found</title>
By default the title displayed is Error 404: Page Not Found, you can replace it with another sentence you want, for example: Sorry! Page Not Found.
Conclusion:
Implementing advanced meta tags can help improve your blog's SEO and enhance its visibility in search engine results and social media platforms. Remember to use relevant keywords, provide accurate descriptions, and follow SEO best practices for better results.
